Hijacking OpenGL to render to the terminal with notcurses
Intro
After my first terminal rendering engine, I wanted
something more. Stumbling upon
notcurses, A cross platform framework slash library for
developing modern TUIs on
modern terminal emulators.
Before I found notcurses, I was messing around with
SDL and it’s library functions
to expose a framebuffer to draw to. Wanting to do the
same with notcurses, I went
straight to the docs. They were okay but I was in the
dark about basically
everything, so I dropped the project.
Fast forward to the future, after searching through
source code of the examples provided
by the notcurses developers, I figured out how to blit
a framebuffer to the screen.
Where from now? Following from my GLSL shader
raymarching project in V (l1mey112/raymarching-v)
using sokol, a high level OpenGL library, I sought out
to render at least something
to the terminal display through notcurses.
You Have To See It To Believe It
Take a look at a recording of the first minute of the notcurses demo.
Now take a look at that same recording of the 60 fps video being played straight back to the terminal.
Fucking impressive right???
That tool used to play back video to the terminal
was called ‘ncplayer’. A fully fledged
media player utilising ffmpeg as a backend and
notcurses as the rendering frontend. The
resolution
isn’t great, but it makes up for that in extremely high
redraw rate being able to dish out frames
incredibly quickly.
Modern terminal emulators are fast, crazy fast. Notcurses seeks to bring the best out of them.
(P.S. I use the alacritty terminal emulator. Text rendering is GPU accelerated!)
It keeps rendering fast by assuming that whatever
was placed on the screen last frame, stayed
there.
It can then go over and only edit pixels which colour
values have changed. It may not sound like much,
just a minor optimistation, but you would be wrong.
Just think about how much overhead is created redrawing
the
entire frame, each frame. Video compression relies on
the fact that pixels tend to keep their values
between
frames, imagine how much larger a video would be if it
stored the entire frame instead of just
interpolations
between a couple ‘I-Frames?’
Anyway, Here Is How To Use It
I won’t go over everything, just what I use. That-is what-the docs-is-for.
First, initialise notcurses and get a pointer to the
standard plane. The standard plane
is always present and is the same size as the
screen.
#include <notcurses/notcurses.h>

struct notcurses *nc = notcurses_init(NULL, stdout);
  // the notcurses context
struct ncplane *pl = notcurses_stdplane(ncr->nc);
  // the standard drawing plane, always the size of the
  // terminal window

ncblitter_e nb = NCBLIT_1x1;
  // NCBLIT_1x1      space, compatible with ASCII
  // NCBLIT_2x1      halves + 1x1 (space) ▄▀
  // NCBLIT_2x2      quadrants + 2x1 ▗▐ ▖▀▟▌▙
  // NCBLIT_3x2      sextants (*NOT* 2x2) 🬀🬁🬂🬃🬄🬅🬆🬇🬈🬉🬊🬋🬌🬍🬎🬏....
  // NCBLIT_4x1      four vertical levels █▆▄▂
  // NCBLIT_8x1      eight vertical levels █▇▆▅▄▃▂▁
  // NCBLIT_BRAILLE  4 rows, 2 cols (braille) ⡀⡄⡆⡇⢀⣀⣄⣆⣇⢠⣠⣤⣦⣧⢰⣰⣴⣶⣷⢸⣸⣼⣾⣿
  // NCBLIT_PIXEL    pixel graphics (if supported)
Notcurses supports using different characters to
represent
each pixel, with each blitter type coming with it’s
own
pixel aspect ratio and the like. Each blitter format
changes the amount of
pixels that fill the terminal. The amount of rows
and
columns on the terminal window do not necessarily
map to how many pixels you need inside a compatible
framebuffer.
Below is the blitter section of the demo on a
terminal emulator called
‘kitty’. Unlike alacritty, this terminal has support
for images with it’s
own
image protocol
natively supported by Notcurses instead of the legacy
Sixel
format.
I recompiled the demo with extra “demo_nanosleeps” in the places it was needed.
void blitter_real_dims(ncblitter_e nb,
                       uint32_t *fb_r_x,
                       uint32_t *fb_r_y)
{
    switch (nb)
    {
    case NCBLIT_1x1:
        break;
    case NCBLIT_2x1:
        *fb_r_y *= 2;
        break;
    case NCBLIT_2x2:
        *fb_r_x *= 2;
        *fb_r_y *= 2;
        break;
    case NCBLIT_3x2:
        *fb_r_x *= 2;
        *fb_r_y *= 3;
        break;
    case NCBLIT_BRAILLE:
        *fb_r_x *= 2;
        *fb_r_y *= 4;
        break;
    case NCBLIT_PIXEL:
    case NCBLIT_DEFAULT:
    case NCBLIT_4x1:
    case NCBLIT_8x1:
        break;
    }
}
To get the real size that the framebuffer must be, I
use this function to translate
between a 1x1 pixel aspect ratio to a nonstandard one
according to the current blitter.
Keep in mind that whenever I say ‘pixel size’ I
actually mean the ratio to a single
character in the terminal and how many ‘pixels’ that
reside inside it.
This allows me to hot-swap the blitter and it
automatically update itself
to the correct pixel size at any point.
With all everything finally set up, use this code to allocate a framebuffer to write to.
uint32_t fb_x, fb_y;                     // variables to store the rows and cols
                                         // of the terminal window
ncplane_dim_yx(pl, &fb_y, &fb_x);        // get rows and cols from the std plane

uint32_t fb_r_x = fb_x, fb_r_y = fb_y;   // variables to store the size in pixels
                                         // for the framebuffer
blitter_real_dims(nb, &fb_r_x, &fb_r_y); // get the real framebuffer size

size_t fb_size = fb_r_x * fb_r_y * sizeof(uint32_t);
uint32_t *fb = malloc(fb_size);
                                         // calculate the size and allocate a
                                         // framebuffer
Rendering it is just as simple.
const struct ncvisual_options opts = {.n = pl,
                                      .scaling = NCSCALE_NONE,
                                      .leny = fb_r_y,
                                      .lenx = fb_r_x,
                                      .blitter = nb};

uint32_t fb_r_xl = ncr->fb_r_x * sizeof(uint32_t);
                                         // the size of a 'stride' of pixels.
                                         // essentially how big in bytes is
                                         // one horizontal scanline

ncblit_rgba(fb, fb_r_xl, &opts);         // 'blit' to the std plane
notcurses_render(nc);                    // render all planes to the screen
The Final API
Here is what an example render loop would bake down
to in the version
of the project without OpenGL.
Want to use that version for your own? It’s in the first commit right here.
typedef struct
{
    struct notcurses *nc;
    struct ncplane *pl;
    ncblitter_e nb;

    uint32_t *fb, fb_r_x, fb_r_xl, fb_r_y, fb_x, fb_y;
} NCRenderer;

NCRenderer *ncr_init(ncblitter_e nb);
void ncr_fullscreen(NCRenderer *ncr);
void ncr_blit(NCRenderer *ncr);

static inline size_t ncr_sizeof_fb(NCRenderer *ncr);
static inline vec2_t ncr_aspect(NCRenderer *ncr);

int main(void) {
    NCRenderer *ncr = ncr_init(NCBLIT_1x1);

    while(true)
    {
        ncr_fullscreen(ncr);           // handle screen resizes and
                                       // allocate new fb if needed

                                       // god tier for loop incoming
        size_t fb_s = ncr_sizeof_fb(ncr) / sizeof(uint32_t);
                                       // 4 byte wide memcpy
                                       // over the whole fb
        for (uint32_t *p = ncr->fb, n = 0;
             n < fb_s;
             n++, *p++ = 0xFF131313);

        size_t fb_stride = ncr->fb_r_xl / sizeof(uint32_t);
        size_t idx = fb_stride * (ncr->fb_r_y / 2)
                     + (ncr->fb_r_x / 2)
                     - 1;
                                       // y * x_stride + x

        ncr->fb[idx + 0] = 0xff0000FF; // rgba(1, 0, 0, 1)
        ncr->fb[idx + 1] = 0xff00FF00; // rgba(0, 1, 0, 1)
        ncr->fb[idx + 2] = 0xffFF0000; // rgba(0, 0, 1, 1)

        ncr_blit(ncr);                 // render fb to screen
    }
}
This is it, handling resizes and all.
It’s time for OpenGL.
The OpenGL ‘context’.
I don’t know much about OpenGL, being my first
proper OpenGL project figuring this all
out took ages.
OpenGL requires a context to function. Generally
this is handled by the operating
system on window creation by interfacing with whatever
display server running.
I don’t need a GUI window, the terminal is all I need to render to.
OpenGL was never designed for rendering to anything
other than a window. It is so tightly
integrated with an operating system’s windows along
with it’s display drivers.
All I wanted to do was write a screen shader for
performing rendering techniques like
raymarching and raytracing, which are both completely
separated from what modern GPUs
are optimised for. The (rasterising) rendering
pipeline.
General computation on the GPU outside of the
rendering pipeline is more suited to OpenCL,
which doesn’t require any kind of window and is
OpenGL’s counterpart for GPU based
parallel computation. I mean it seemed pretty good,
until I realised OpenCL was
just C with nonstandard extensions for the GPU. Not
good for graphics, I wanted
GLSL and all of it’s quality of life features for
working with vectors and matricies.
Compute shaders were introduced into the OpenGL
specification for this, skipping the
pipeline to render straight to a texture. But what’s
the point of a compute shader if
you still need a window?
I compromised instead.
How did I do it?
First, I used the GLFW library to create a hidden window. (GLFW Docs)
#include <GL/glew.h>
#include <GLFW/glfw3.h>

glfwInit();                            // init GLFW
glfwWindowHint(GLFW_VISIBLE, 0);       // force window to be hidden

GLFWwindow *offscreen_ctx = glfwCreateWindow(640, 480, "", NULL, NULL);
                                       // create window, initial
                                       // dimensions mean nothing

glfwMakeContextCurrent(offscreen_ctx); // this is my new context
glewInit();                            // init OpenGL functionality
Since all we use the hidden window for is for an
opengl context, we cannot render to it.
Nothing will be shown. You need to create a secondary
framebuffer to replace the existing
default one. Every framebuffer object needs at least
one texture for colour to render to,
create that also.
LearnOpenGL was an incredible help figuring all this out.
GLuint fbo;                             // most objects in OpenGL are stored as an
glGenFramebuffers(1, &fbo);             // unsigned 32 bit integer

glBindFramebuffer(GL_FRAMEBUFFER, fbo); // bind the framebuffer to the window, this
                                        // will be the new render target

GLuint fbtex;                           // OpenGL texture boilerplate incoming
glGenTextures(1, &fbtex);
glBindTexture(GL_TEXTURE_2D, fbtex);
glTexImage2D(GL_TEXTURE_2D, 0, GL_RGBA, 640, 480, 0, GL_RGBA, GL_UNSIGNED_BYTE, NULL);
glTexParameteri(GL_TEXTURE_2D, GL_TEXTURE_MIN_FILTER, GL_LINEAR);
glTexParameteri(GL_TEXTURE_2D, GL_TEXTURE_MAG_FILTER, GL_LINEAR);
glFramebufferTexture2D(GL_FRAMEBUFFER, GL_COLOR_ATTACHMENT0, GL_TEXTURE_2D, fbtex, 0);

assert(glCheckNamedFramebufferStatus(fbo, GL_FRAMEBUFFER) == GL_FRAMEBUFFER_COMPLETE);
                                        // checking if everything went smoothly
Again, the 640 by 480 size does not matter. Textures
in OpenGL are dynamic, another call to
‘glTexImage2D’ with the correct bounds will
automatically fix everything up.
Now that the display is using a different
framebuffer, one that we can peek into using it’s
texture, simply copying it straight out to the
notcurses framebuffer doesn’t take much more
code. That’s the complete setup done.
The Render Loop
Inbetween the notcurses calls start rendering absolutely anything using OpenGL. Anything.
I recomend the OpenGL’s version of a ‘hello world’, the hello triangle.
But if this is your first project using OpenGL, why are you here?
while (true)
{
    ncr_fullscreen(ncr);

    glClearColor(0.0f, 0.0f, 0.0f, 1.0f);
    glClear(GL_COLOR_BUFFER_BIT);

    // glDrawWhatever();

    ncr_opengl_blit(ncr);
    ncr_blit(ncr);
}
The function below is where all the magic happens,
taking the image data from the
framebuffer’s texture and writing it to the
framebuffer.
void ncr_opengl_blit(NCRenderer *ncr)
{
//  glPixelStorei(GL_PACK_ALIGNMENT, 1); // may be needed
    glActiveTexture(GL_TEXTURE0);

    glGetTexImage(GL_TEXTURE_2D, 0, GL_RGBA, GL_UNSIGNED_BYTE, ncr->fb);
//  glReadPixels(0, 0, ncr->fb_r_x, ncr->fb_r_y, GL_RGBA, GL_UNSIGNED_BYTE, ncr->fb);
//  functionally equivalent
}
I mean, that’s literally it. The real hard part was just learning OpenGL the unconventional way… and figuring out that above function.
Down below is the hello triangle, I followed a
tutorial on open.gl instead of
the one on LearnOpenGL
because it shows you how to implement vertex
attributes. Vertex attributes were needed so I could
get UV coordinates on the screen.
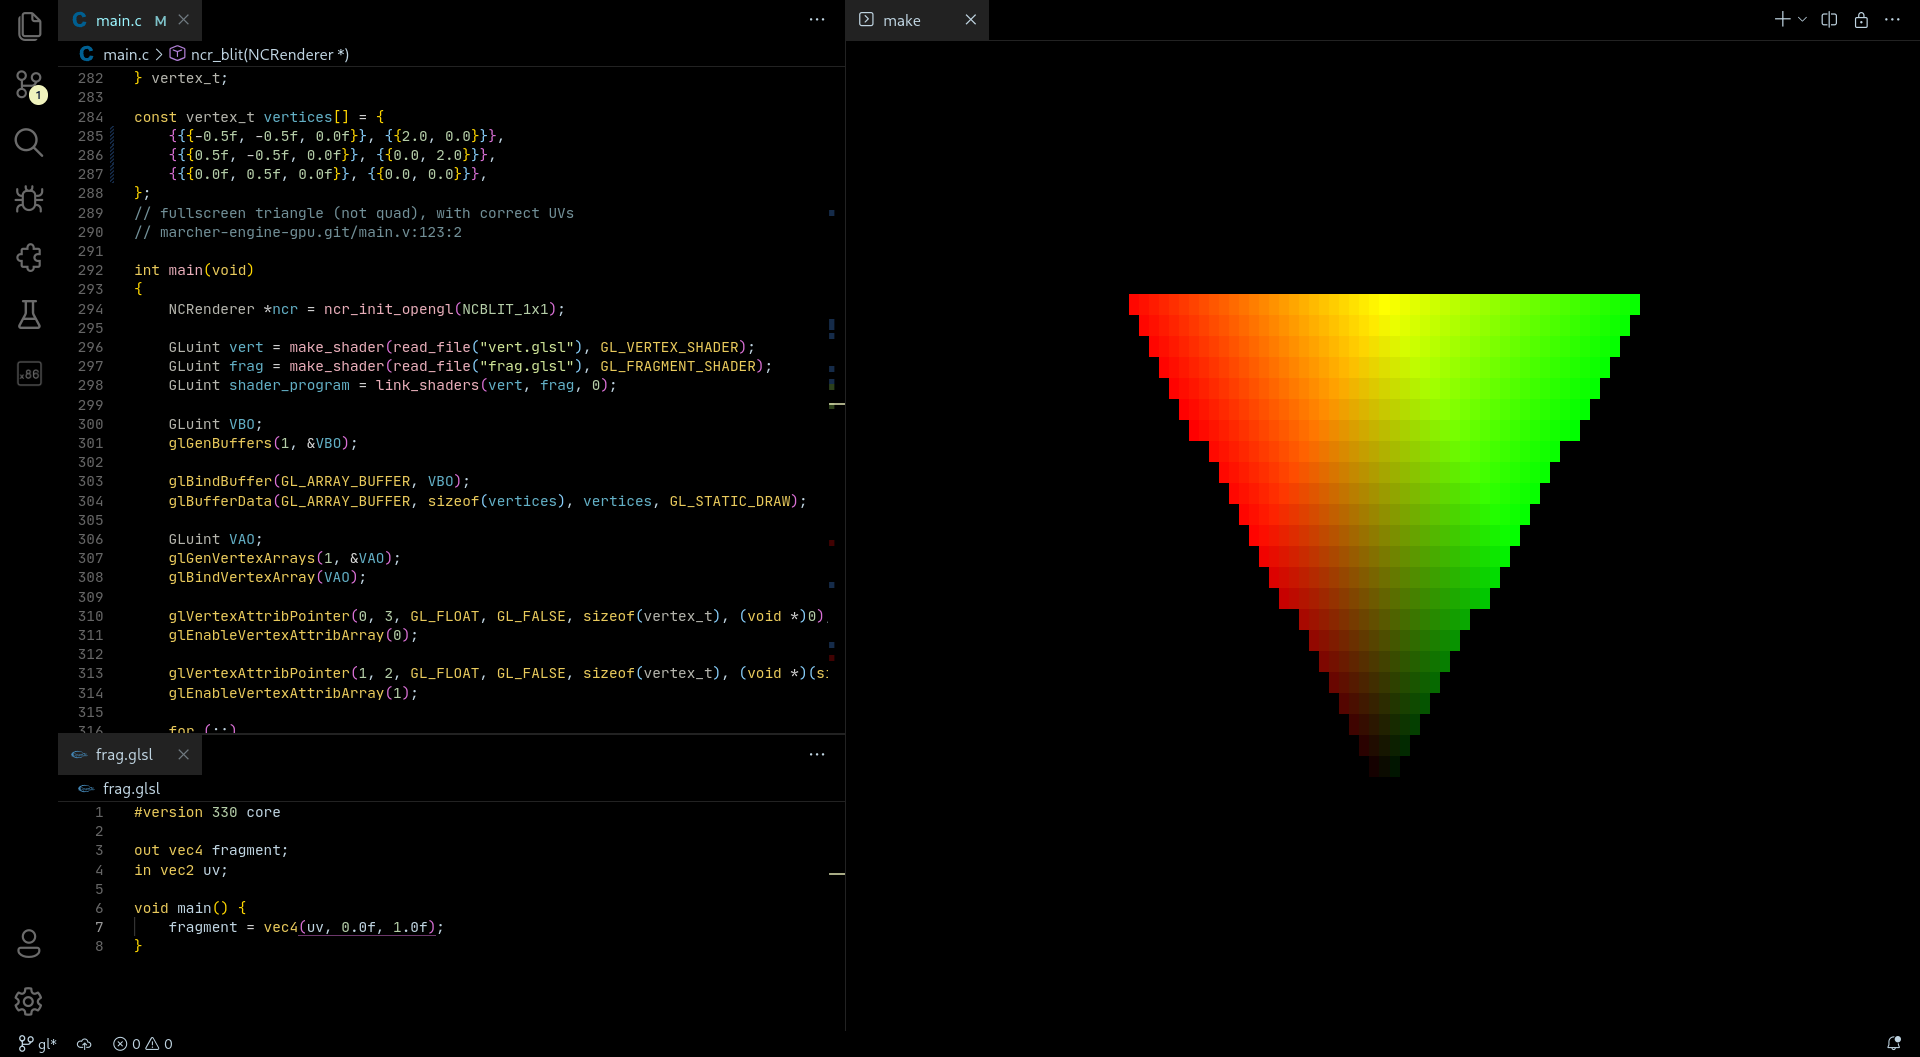
Wait, that doesn’t look right. The triangle is upside down!
I didn’t do anything wrong, this is just how OpenGL
works internally. Framebuffers are always flipped on
the vertical axis and
appear the right way up when rendered to a window, we
aren’t using one.
How this is solved is up to you.
Flipping each individual pixel from top to bottom is
incredibly expensive, do NOT do this. Using OpenGL
proper with
camera matricies? Just invert the vertical component
with zero cost to rendering. Just using screenspace
rendering
with the fragment shader and a screen wide
quad/triangle? You can flip the polygon or give it
flipped UVs, your call.
Hold on, a screen space shader using a triangle instead of a quad?
It’s a nice trick from the Godot Engine
documentation, here.
While it is also a small rendering optimistation, it
saves me from dealing with index buffers. Extra
boilerplate I don’t need.
Here is the flipped triangle and it’s UV vertex attributes.
const vertex_t vertices[] = {
    { 3.0,  1.0, 0.5, 2.0, 0.0},
    {-1.0, -3.0, 0.5, 0.0, 2.0},
    {-1.0,  1.0, 0.5, 0.0, 0.0},
};
typedef struct
{
float x, y, z;
float u, v;
} vertex_t;The End
Without notcurses, writing pixels to the screen would be the bottleneck.
With notcurses, the GPU is the bottleneck!
To demo it all, as tradition, I wrote a fragment shader to compute the mandelbrot set.
Scroll the mouse to zoom in and out, arrow keys to move around.
You see the pixels glitching out there at the end as
I zoom far in? Yeah, GPUs aren’t good with floating
point precision. Any serious
fractal render does calculations on the CPU with SIMD
instructions to parallelise it all.
int a;
int b[2];
glGetShaderPrecisionFormat(GL_FRAGMENT_SHADER, GL_HIGH_FLOAT, (int *)&b, &a);
printf("Floating point bits of precision: %d\n"
       "Lowest value: -2e%d\n"
       "Highest value: 2e%d\n", a, b[0], b[1]);
My GPU’s highest floating point precision avaliable
is equal to a ‘single precision float’ in the IEEE 754
standard.
If you don’t know what that means, don’t worry. A
single precision float is a 32 bit floating point value
equal to the ‘float’
type in C. As a comparision, the project
before used 80 bit floats
but was exponentially slower.
Vendor: NVIDIA Corporation
Renderer: NVIDIA GeForce RTX 2070
Version: 4.6.0 NVIDIA 515.76
Shader language: 4.60 NVIDIA
Floating point bits of precision: 23
Lowest value: -2e127
Highest value: 2e127
The repository is riiiiiiight here. Star it on Github here too, I’ll need them.
GOODBYE.